
Views: 222 Author: Rebecca Publish Time: 2025-03-06 Origin: Site


Content Menu
● Introduction to Electrical Kettles
>> Basic Components of an Electrical Kettle
>> Circuit Diagram Explanation
● Advanced Features: Temperature Control
>> Block Diagram of Temperature Control System
● Repairing a Faulty Kettle Switch
● Automatic Shut-Off Mechanism
● Safety Features and Maintenance
● Designing an Auto-Turn-Off Switch
>> 1. What are the basic components of an electrical kettle?
>> 2. Why is a relay necessary in a kettle switch circuit?
>> 3. How do I repair a faulty kettle switch?
>> 4. What safety precautions should I take when working with electrical circuits?
>> 5. Can I use an Arduino to control a kettle switch?
Building an electrical kettle switch is a fascinating project that involves understanding electrical circuits, safety precautions, and practical implementation. This article will guide you through the process of designing and constructing a kettle switch, including the necessary components, circuit diagrams, and safety considerations.

Electrical kettles are common household appliances used for heating water. They typically include a heating element, a thermostat to control temperature, and a switch to turn the kettle on and off. The switch is crucial as it controls the flow of electrical current to the heating element.
- Heating Element: This is usually a coil of nichrome wire that heats up when an electric current passes through it.
- Thermostat: This component is responsible for automatically turning off the kettle when the water reaches boiling point.
- Switch: The primary control for turning the kettle on and off.
To build a kettle switch, you need to understand the basic electrical circuit involved. The switch must be able to handle the high voltage and current required by the kettle.
A basic kettle switch circuit involves a simple on/off switch connected to the mains supply. However, for safety and efficiency, you might want to include additional components like a relay and a thermostat.
- Relay: Used to control the high voltage supply to the kettle.
- Transistor: Acts as a driver for the relay.
- Diode: Protects the transistor from back EMF.
Here is a simplified circuit diagram for a kettle switch using a relay:
Mains Supply -> Relay -> Heating Element
Arduino/Controller -> Transistor -> Relay Coil
In this setup, the Arduino or any microcontroller controls the transistor, which in turn activates the relay. The relay then connects the mains supply to the heating element.
1. Use Proper Insulation: Ensure all wires are properly insulated to prevent electrical shock.
2. Use a Relay: Relays are essential for controlling high voltage devices safely.
3. Grounding: Ensure the circuit is properly grounded to prevent electrical shock.
1. Prepare Components:
- Relay (230V AC rated)
- Transistor (e.g., NPN)
- Diode (1N4007)
- Arduino or Microcontroller
- Breadboard and Jumper Wires
2. Connect the Relay:
- Connect the relay coil to the transistor.
- Connect the transistor base to the Arduino output pin.
- Connect the diode across the relay coil for protection.
3. Connect the Heating Element:
- Connect the heating element to the relay contacts.
4. Connect the Mains Supply:
- Connect the mains supply to the relay input contacts.
5. Test the Circuit:
- Use a multimeter to check for continuity and ensure all connections are secure.
- Test the circuit with a low voltage supply before connecting it to the mains.

For more advanced projects, you might want to incorporate temperature control using a thermistor. A thermistor is a temperature-sensitive resistor whose resistance changes with temperature. This can be used to control the kettle's temperature within a specific range.
A thermistor can be connected to a voltage comparator IC, which generates a signal to control the relay based on the temperature reading. This setup allows for precise temperature control, making the kettle safer and more efficient.
The system consists of three stages:
- Power Supply Stage: Provides the necessary voltage for the circuit.
- Comparator Stage: Compares the voltage from the thermistor with a reference voltage to determine if the desired temperature is reached.
- Switching Stage: Uses a relay to turn the kettle on or off based on the comparator's output[1].
If your kettle switch is faulty, you might need to repair or replace it. Here are some steps to follow:
1. Unplug the Kettle: Ensure the kettle is unplugged before starting any repairs.
2. Disassemble the Kettle: Use a screwdriver to remove the screws holding the kettle's base or lid.
3. Inspect the Switch: Look for any obvious damage like broken wires or burnt contacts.
4. Clean or Replace the Switch: Clean the switch if it's dirty or replace it if damaged.
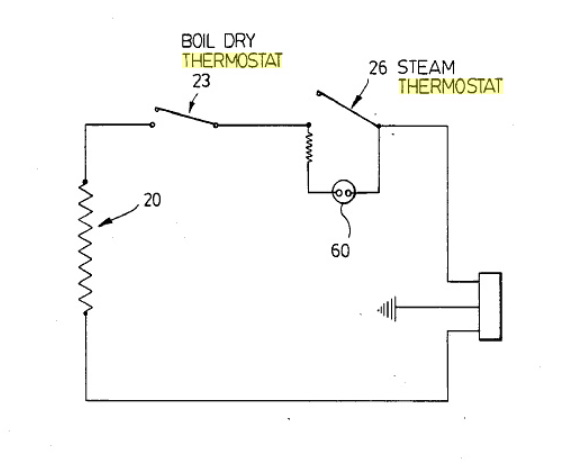
Most modern kettles include an automatic shut-off mechanism to prevent overheating and ensure safety. This mechanism typically involves a bimetallic strip thermostat that bends when heated, breaking the electrical circuit and stopping the heating process[2].
The bimetallic strip is made of two metals with different thermal expansion properties. When heated, one metal expands more than the other, causing the strip to bend and trigger the shut-off mechanism.
- Boil-Dry Protection: Prevents the kettle from operating without water.
- Thermal Fuse: Protects against overheating by breaking the circuit if the temperature exceeds a certain limit.
- Overflow Protection: Prevents water from overflowing during operation.
- Base Power Cut-Off: Automatically cuts power when the kettle is lifted from its base.
- Regular Descaling: Removes mineral deposits that can affect performance.
- Contact Cleaning: Ensures good electrical contact and prevents corrosion.
- Switch Mechanism Inspection: Regularly check the switch for any signs of wear or damage.
- Power Cord Maintenance: Ensure the power cord is not damaged or frayed.
If you want to create an auto-turn-off feature for your kettle, you can use a timer circuit. This involves using a 555 timer chip or a similar component to control a relay that switches off the mains supply after a set time.
Here's a basic idea of how you can implement a timer using a 555 chip:
1. Connect the 555 Timer: Use the 555 timer in monostable mode to generate a pulse after a set time.
2. Connect the Relay: Use the output of the 555 timer to drive a transistor, which in turn controls the relay.
3. Set the Time: Adjust the components (resistors and capacitors) connected to the 555 timer to set the desired time delay.
Mains Supply -> Relay -> Heating Element
555 Timer -> Transistor -> Relay Coil
In this setup, the 555 timer generates a pulse after a set time, which turns off the relay and disconnects the mains supply from the heating element.
Building an electrical kettle switch involves understanding basic electrical circuits and safety precautions. By following the steps outlined in this article, you can create a functional and safe switch for your kettle project. Remember to always use proper insulation and grounding to prevent electrical hazards.

The basic components include a heating element, thermostat, and switch. The heating element is typically a nichrome wire coil, the thermostat controls the temperature, and the switch turns the kettle on and off.
A relay is necessary because it allows the low voltage circuit (e.g., Arduino) to safely control the high voltage mains supply to the kettle.
To repair a faulty kettle switch, unplug the kettle, disassemble it to access the switch, inspect for damage, clean or replace the switch as needed, and reassemble the kettle.
Always ensure proper insulation of wires, use grounding to prevent electrical shock, and test circuits with low voltage before connecting to mains.
Yes, you can use an Arduino to control a kettle switch by connecting it to a relay. The Arduino controls the relay, which in turn connects the mains supply to the kettle.
[1] https://www.myprojectcircuits.com/materials/design-and-construction-electric-kettle-with-control-switch/
[2] https://www.yongkeng.com/how-electric-kettle-switch-works.html
[3] https://www.energex.com.au/safety/safety-at-home-or-work/safety-switches-and-electrical-equipment
[4] https://forum.allaboutcircuits.com/threads/please-help-me-design-a-auto-turn-off-switch-for-a-kettle.61551/
[5] https://shivatools.com/products/electric-kettle-switch-16a-250v-thermostat-switch-2-pin-terminal-switch-for-kettle-spare-parts
[6] https://karisimby.wordpress.com/2009/08/10/standard-kettle-circuit-diagram/
[7] https://www.cnappliances.com/info/precautions-for-electric-kettles-74022075.html
[8] https://electronics.stackexchange.com/questions/8929/switching-a-kettle-on-off-using-a-arduino
[9] https://www.pinterest.com/pin/standard-kettle-circuit-diagram--828029081474450454/
[10] https://www.electricalsafetyfirst.org.uk/guidance/product-safety/kettles/
[11] https://community.home-assistant.io/t/diy-smart-kettle/244041
[12] https://www.alibaba.com/showroom/kettle-switches.html
[13] https://www.hkfsd.gov.hk/eng/source/notices/Fire_Protection_Notice_No_9.pdf
[14] https://www.youtube.com/watch?v=dl_F-wn584Q
[15] https://www.labour.gov.hk/eng/public/os/D/Work_Safety_Electrical_Safety_and_You.pdf
[16] https://www.youtube.com/watch?v=qohpGnq0oMQ
[17] https://media3.bosch-home.com/Documents/9001366995_A.pdf
[18] https://www.atlantictraining.com/blog/15-safety-precautions-electrical-safety/
[19] https://www.labour.gov.hk/eng/public/os/C/B145.pdf
[20] https://www.youtube.com/watch?v=u0QhtT7zNHY